Friday, October 23, 2015

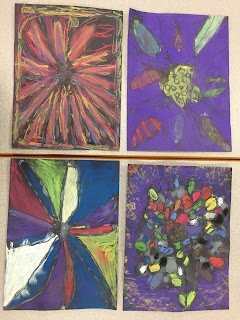
Georgia O'Keeffe Flowers

We started by reading a book about Georgia O'keeffe and how she loved to draw and paint things in nature. When Georgia O'Keeffe paints flowers she makes them HUGE and extends the painting off the caves.


To start the project, the students drew flowers on black construction paper and then outlined their designs with GLUE!


Once the glue dries it provides a crisp black outline for our chalk coloring. The chalk pastels resist wherever the glue has dried. 
In preparation for this project, the students made color wheels using chalk and learned how well the chalks blend together. 


They had a blast using the chalk pastels to mix their own colors for their flowers!


Here are some of their finished flowers! 
I love how each flower is so unique and COLORFUL!


Thursday, October 22, 2015

Texture Rubbings

Okay, who doesn't remember doing texture rubbings when they were younger! 
It's such a fun way to experiment with textures.

Here are some pictures of the kindergarteners going around the room to find different textures.


The older students talked about the difference between actual and visual texture. 
They also used texture rubbing plates of different leaves and insects to create their art!


The students LOVED watching their image appear out of nowhere! ;)


Keep Creating!
-Mrs. Hartford


Symmetry Pumpkins


This was a quick, one day project that the students (and I) thoroughly enjoyed!

These Jack-o-Lanterns were a great exercise on symmetry and were the perfect project to help us celebrate (FINALLY) having some fall weather. :)


Kandinsky Trees


1st Grade made these abstract Kandinsky Trees!
I wish I would have taken pictures of the process, but regardless, the end results were worth posting!

First, we looked at the abstract art Kandinsky made using only circles (it was no coincidence we were learning about this on International Dot Day!)

The students traced their hands for the trunk of the tree, then cut circles out on construction paper for the top of the tree.


Keep Creating!
-Mrs. Hartford

Heather Galler Landscapes

We spent some time studying the artist Heather Galler. We talked about how she uses tons of patterns and unrealistic colors to make abstract landscapes. Below is an example of her work. Stunning!


The students drew their landscapes and then began filling them with patterns. They divided the bottom of their landscapes into 7 sections and filled each with a different design.


The students then used markers to give their landscapes bright colors- just like Heather Galler!


The colors and patterns make these landscapes so much fun! 


Keep Creating!
-Mrs. Hartford

Tuesday, October 6, 2015

Paper Marbling

This week there were a few 4th, 5th, and 6th grade classes that worked VERY hard to complete their projects- which means we had time to experiment with paper marbling!

First, you have a little circle of paper called "float paper" in a tub of water. Then, you drop various colors of ink on the float paper. The paper causes the ink to stay on the surface of the water. You can create various designs with the floating ink. To transfer the ink to your paper, you simply drop it on the surface of the water and lift it up. The beautiful marbling designs are then printed on the paper!


Students carefully dropping ink onto the float paper. If the ink falls onto the water, it will just sink to the bottom.

Once the ink hits the float paper, it spreads across the surface of the water.

You can then create beautiful swirled designs with the ink.


After creating the ink designs you want, you simply drop the paper on top of the water and lift it up!


The results are this beautifully marbled paper!


I cannot stress enough how well these students worked together to create their marbling designs. What a great team-builing activity!


Keep Creating!
- Mrs. Hartford

Friday, October 2, 2015

String Art

The 6th grade class just finished working on their string art circles! I wish I would've taken pictures as they were working because they worked so hard on these. They had 3 designs that they could choose from, or they could create their own. 

The traced their cardboard circles and punched the holes to sew in. Then, they used embroidery thread and tapestry needles to sew their designs.

This was a time-consuming project and I'm so proud of them for sticking with it. 
The results are beautiful!


I cannot stop staring at these. Beautiful!

Keep Creating!
- Mrs. Hartford

Thursday, October 1, 2015

Op Art

4th and 5th graders learned about OP ART. 
Op Art: A form of abstract art that gives the illusion of movement by the precise use of pattern and color.

The students created their designs with pencil, traced them with sharpie, and then added SHADING using colored pencils.


The students shaded with COMPLEMENTARY COLORS, or colors that are OPPOSITE on the color wheel.


The finished projects look AMAZING! The students loved seeing how their designs popped once they added shading!